Learning Intentions
Understand features of a good conversation.
Success Criteria
-
Watch "How to have a good conversation" by Celeste Headlee.
-
Complete the Consolidation Task provided.
What is communication?
Definition: Communication is when a message is sent by one person and received by another.
What is a good conversation?
A great conversation requires a balance between talking and listening. This balance is important because bad communication leads to bad relationships, at home, at work, everywhere.
How to Have a Good Conversation - Celeste Headlee
Science with Dobrich
The particle and kinetic theories of matter can be used to describe the arrangement and motion of particles in a substance, including the attraction between particles, and to explain the properties and behaviour of substances, including melting point, boiling point, density, compressibility, gas pressure, viscosity, diffusion, sublimation, and expansion and contraction.
![[1] Intro to Particles](https://static.wixstatic.com/media/11062b_fa4cfd04e99d45bea4b8c4c98f90316a~mv2.jpg/v1/fill/w_147,h_104,al_c,q_80,usm_0.66_1.00_0.01,blur_2,enc_avif,quality_auto/11062b_fa4cfd04e99d45bea4b8c4c98f90316a~mv2.jpg)
[1] Intro to Particles
SEE, THINK, WONDER
HOOK
-
Watch the two short videos of Brownian Motion
-
Describe what your SEE?
-
What does it make your THINK?
-
What do you WONDER?
LEARNING INTENTIONS:
-
Understand that all matter is made of particles.
-
Learn how particles behave in solids, liquids, and gases.
SUCCESS CRITERIA:
-
Describe matter using the particle model.
-
Outline how developments in scientific understanding have changed the particle model over time.
-
Compare & contrast how particles move and are arranged in each state.
-
Draw and label particle diagrams for solids, liquids, and gases.
Observing Particles - Brownian Motion
Brownian Motion
GLOSSARY
Brownian motion is the random, jerky movement of tiny particles (like dust or pollen) when they are floating in a liquid or gas.
This movement happens because the invisible particles of the liquid or gas are constantly bumping into the tiny particles and pushing them around.

Brownian motion is proof that particles are moving, even if we can’t see them:
-
In 1827, a scientist named Robert Brown looked at tiny pollen grains in water through a microscope.
-
He saw the pollen jiggling and bouncing around.
-
At first, he thought the pollen was alive – but it was actually being hit by invisible water particles!
-
This movement is called Brownian motion.
Brownian motion shows that:
-
Particles are always moving.
-
They can hit and move other tiny particles.
-
The random, jerky movement we see in things like smoke or dust proves particles are real and in constant motion.


Particle Theory
Everything around us is made of tiny particles — they’re like building blocks that are so small we can’t usually see them, even with a microscope.
The Particle Model helps us understand how solids, liquids, and gases act. In each state of matter, the particles are arranged differently and move in different ways. Particles are always moving, even in solids where they only vibrate.
The Evolution of the Atomic Particle Model
Particles make up all matter. In science, we often show them as simple spheres, but real particles are much more complex. Our understanding of particles has been developing for over 2,000 years, and the particle model has changed as new discoveries were made.
Timeline Card Sort
ACTIVITY
INSTRUCTIONS: Look at the particle model cards. With your peers, decide the order these ideas developed. Place each stage on the timeline below.
CHECK ANSWERS
States of Matter & Particle Motion
GIF CREDIT: Wiki Commons
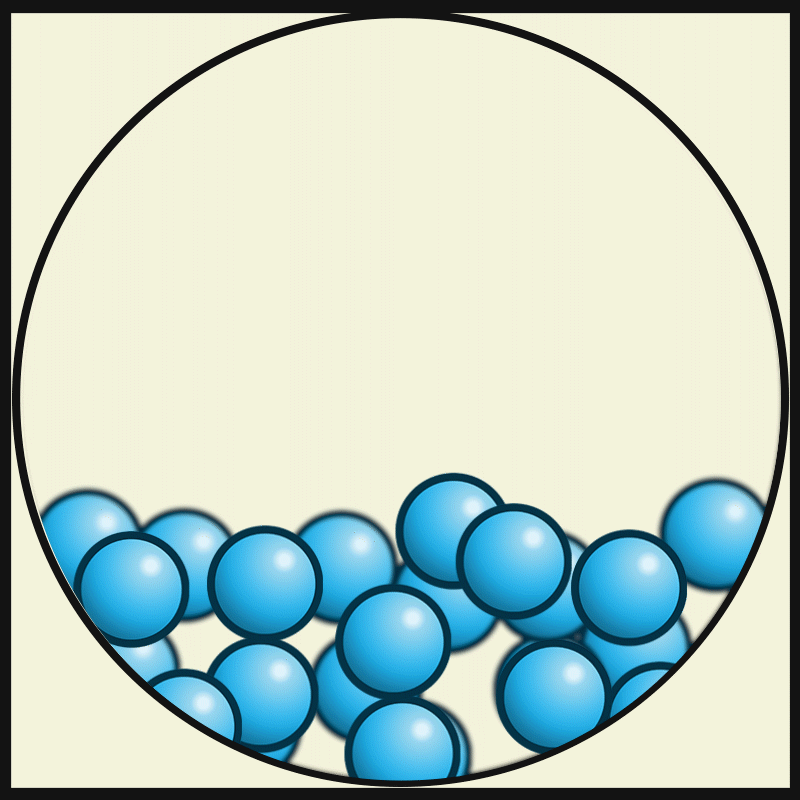
SOLID PARTICLES
Particles in States of Matter
ACTIVITY
Compare and contrast the way particles move in solid, liquids and gases. Consider the amount / speed of particle movement, distance between particles, attractive forces, and positioning. Create a graphic organiser that summarises your observations.

LIQUID PARTICLES
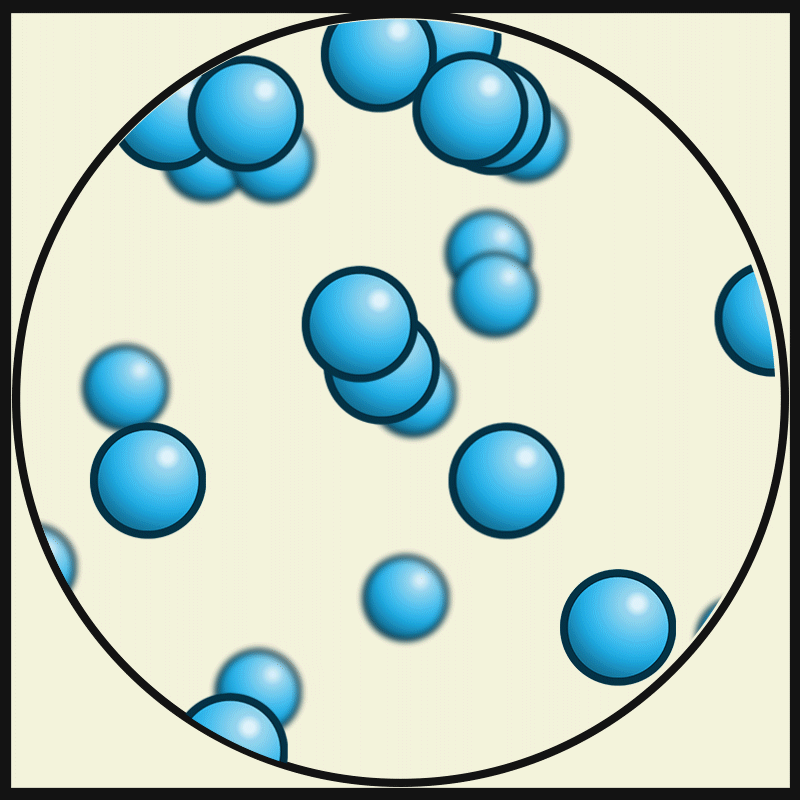
GASEOUS PARTICLES
SUCCESS CRITERIA CHECKPOINT
CLOZE
✅ In one sentence, describe matter and the particle model.
✅ Use words or pictures to briefly outline how the particle model has changed over time.
✅ Compare and contrast how particles move and are arranged in each state of matter (solids, liquids, gases).
✅Draw and label particle diagrams for solids, liquids, and gases.


LEARNING INTENTIONS:
Understand how heat and pressure affects particle motion, energy and spacing.
SUCCESS CRITERIA:
-
Explain the relationship between the state of matter and the movement (speed), energy (heat) and distance of particles.
-
Recall terms to describe phase changes.
-
Use diagrams to explain particle behaviour and phase changes.
PhET DIGITAL INQUIRY: The effect of heat of on the motion & energy of particles
Matter on Earth commonly exists in three states: solid, liquid, and gas. Some substances, like water, naturally occur in all three. Others can be changed from one state to another through human intervention—for example, turning carbon dioxide gas into solid dry ice. As matter changes state, the particles motion increases or decreases as they gain or lose energy (heat).

DISCUSS
Do you think air can freeze?
PhET: Investigating the States of Matter
ACTIVITY
INSTRUCTIONS: Access the online interactive PhET: States of Matter (Basics). Use the interactive to investigate the effect of heat on the motion and energy of particles in different states of matter. Complete the tasks and questions provided.
Phase Changes
Phase changes are when a substance changes from one state of matter to another. For example:
Melting – Solid turns into liquid (e.g., ice melts into water).
Freezing – Liquid turns into solid (e.g., water freezes into ice).
Evaporation – Liquid turns into gas (e.g., water evaporates into steam).
Condensation – Gas turns into liquid (e.g., steam becomes water droplets).
Sublimation – Solid turns straight into gas without becoming liquid (e.g., dry ice).
Deposition – Gas turns straight into solid (e.g., frost forming on a window).
These changes happen when heat is added or removed, affecting how particles move and arrange.
Matter & Phase Change - Visual Summary
ACTIVITY
Compare and contrast the phase changes that lead to different states of matter. Create a visual diagram that summarises these phase changes between solids, liquids and gases. Add arrows showing the direction of change and particle energy (heat). Label your diagram using appropriate scientific terminology.

SUCCESS CRITERIA CHECKPOINT
CLOZE
✅Explain the relationship between the state of matter and the movement (speed), energy (heat) and distance of particles.
✅Recall terms to describe phase changes.
✅Use diagrams to explain particle behaviour and phase changes.
[3] Melting & Boiling Points
How is lava similar to a glacial river?


THINK - PAIR - SHARE
HOOK
THINK - Take a moment to think quietly on your own about the question. .
PAIR - Turn to a partner and share your thoughts.
Listen to what your partner says too!
SHARE - As a pair, get ready to share your ideas with the class or group.
LEARNING INTENTIONS:
Understand melting and boiling points.
SUCCESS CRITERIA:
-
Explain what melting and boiling points are.
-
Collect and record temperature data during phase changes.
-
Compare the melting/boiling points of different substances.
-
Justify why certain materials are used in specific products based on their melting/boiling points.
Melting Point & Boiling Point
All substances melt or boil at specific temperatures. Substances have different melting and boiling points because of the strength of the forces between their particles. These forces are called intermolecular forces in liquids and chemical bonds in solids.
Melting point: the temperature a solid turns to liquid.
Boiling point: the temperature a liquid turns to gas.
Coldest to Hottest
ACTIVITY
INSTRUCTIONS: Analyse the eight phase change scenario cards. Sequence them from coldest to hottest in terms of when each of these changes occur.
CHECK ANSWERS
🥼LAB: Heating Ice to Steam
THEORY: Ice is the solid form of H2O. Its melting point is 0 °C i.e., the forces of interaction between the molecules in the solid form of H2O can be broken down at 0 °C and solid H2O gets converted into liquid water.
AIM: To observe the different states and phase changes of water.

Heating Ice to Steam
ACTIVITY
INSTRUCTIONS: In this experiment, you will heat crushed ice and record how its temperature changes as it melts and boils in order to observe phase changes and understand how heat affects particle movement.
Listen carefully to your teacher as they explain this experiment and the related safety precautions.
DISCUSS
When you apply heat energy to a substance, where does the energy go?
SUCCESS CRITERIA CHECKPOINT
CLOZE
✅ Explain what melting and boiling points are.
✅ Summarise the changes you would observe in temperature when recording data as water transitions from ice to steam.
✅ Using the example of water and one other substance, compare how melting/boiling points vary for different substances.
✅ Using examples, justify why certain materials are used in specific products based on their melting/boiling points.
[FA-1] Particles + Matter
How to Study... Effectively!
HOOK
1. With a peer, discuss your current study strategies:
-
Do you engage in a study routine? Why or what not?
-
What does your study routine look like? Or - what could it look like?
2. Watch the TED Ed. video "3 Tips on how to Study Effectively".
3. Summarise "3 Tips on how to Study Effectively" - according to TED-Ed.
LEARNING INTENTIONS:
Review & consolidate learning on particles and matter.
SUCCESS CRITERIA:
-
Complete Formative Assessment Tasks #1
-
Use answers to self-assess learning progress.
-
Reflect on learning progress by identifying areas for improvement.
Formative Assessments
Formative assessment is a way for teachers to check how well you're understanding the material while you're still learning it. It's like a practice run before the big test.
The goal is to give you feedback so you can improve and understand the subject better before the final exam.
Formative Assessment #1
ACTIVITY
INSTRUCTIONS:
-
Complete this task in a similar way to how you would do a real test.
-
When you are done, use the answer key (provided by your teacher) to self-assess your responses.

[4] Density

SINK OR FLOAT?
HOOK
EXAMINE the range of objects provided by your teacher.
PREDICT which objects will sink and which will float in water.
OBSERVE the results by watching your teacher add each of the objects into a large container of water.
RECORD your predictions and the observed outcomes.
DISCUSS
Why do some heavier-looking items float and some smaller ones sink?
LEARNING INTENTIONS:
Explore the relationship between density, the closeness of particles and how this affects whether things sink or float.
SUCCESS CRITERIA:
-
Explain density using the particle model and the terms mass (how heavy) and volume (how much space it takes).
-
Calculate density using the formula density = mass ÷ volume (d = m ÷ v).
-
Measure and test density by seeing if things sink, float, or stack in water or other liquids.
What is Density?
Density is how tightly packed the particles are in a substance. If particles are close together, the substance is dense. If they are spread out, it's less dense.
We calculate density using the formula:
Density = Mass ÷ Volume
-
MASS = How heavy something is
-
VOLUME = How much space it takes up


Density and Archimedes’ Eureka!
Archimedes' Eureka! refers to when the ancient Greek scientist Archimedes discovered how to measure volume using water displacement. He realised that when an object is placed in water, it pushes out (displaces) an amount of water equal to its volume — helping him figure out if a crown was made of pure gold. He shouted "Eureka!" meaning "I’ve found it!"

Using a Eureka can to find density:
-
Fill the can until water drips out, then stop.
-
Place a measuring cylinder under the spout.
-
Gently lower the object into the water.
-
Catch the water that spills out — this is the object’s volume.
-
Weigh the object to find its mass.
-
Use the formula: Density = Mass ÷ Volume.
🥼LAB: Density Column Challenge
Part A – Measure Mass and Volume
Measure the Mass
-
Place the substance or object on the electronic balance.
-
TARE the scale first to ensure accurate measurement (zero the balance before use).
-
Record the mass in grams (g).
Measure the Volume
-
If it’s a liquid or has a regular shape, use a measuring cylinder to measure the volume in millilitres (mL).
-
If the object has an irregular shape, use a Eureka can to measure its volume:
-
Fill the Eureka can until it just starts to drip.
-
Carefully lower the object into the water using a string.
-
Collect the displaced water in a measuring cylinder.
-
Record the volume of displaced water (this is the object's volume) in mL.
-
Calculate the Density
-
Use the formula: Density = Mass ÷ Volume (d = m / v)
-
Record the density in g/cm³ (note: 1 mL = 1 cm³).
-
Repeat for each item or substance.
Part B – Create a Density Column
-
Using the densities you calculated, order each liquid and object from least to most dense.
-
In a clear cylinder or jar, carefully pour each liquid in order from most dense (bottom) to least dense (top). Pour slowly over a spoon or down the side to prevent mixing.
-
Gently drop solid objects into the column and observe where they settle. They will float or sink to the layer that matches their density.
Observe and Record
-
Sketch or photograph your density column.
-
Label each layer and object with its name and calculated density.
Calculating Density
ACTIVITY
INSTRUCTIONS: In this task, you will measure and calculate the density of different materials using the formula:
Density = Mass ÷ Volume (d = m / v)
You will then use this data to create a density column where substances are correctly layered based on density.

SUCCESS CRITERIA CHECKPOINT
CLOZE
✅ Explain density using the terms mass and volume.
✅ Using a specific example, explain how density of a substance can be calculated using the formula d = m ÷ v.
✅ Explain why some objects or substances sink (e.g. a metal bolt) whilst others float (e.g. a plastic bead), using particle arrangement and density.
[5] Viscosity

Can you guess...?
HOOK
In 1927, Thomas Parnell, the first Professor of Physics at the University of Queensland, set up a strange experiment observing the substance pitch. Pitch is a black substance that comes from petroleum or plants. It is sometimes called bitumen or tar, and it's used for things like road paving. Can you guess...
Why is this experiment significant?
a) It's the longest running lab experiment on record
b) It's the shortest running lab experiment on record
c) It's the most dangerous lab experiment on record
d) It's the most expensive lab experiment ever built
What is this experiment trying to find out?
a) If pitch changes state as it falls
b) If pitch is more dense in its liquid form than its solid form
c) If pitch melts when left at room temperature
d) Whether pitch is a solid or a liquid
TRIVIA TIME
??
Did you guess right?
Watch these videos to find out...
LEARNING INTENTIONS:
Explore the relationship between the particles in liquids and their viscosity.
SUCCESS CRITERIA:
-
Define viscosity and give real-life examples.
-
Use particle theory to explain why some liquids flow faster than others.
-
Measure and compare the flow rate / drop rate of different liquids.
-
Record and analyse data to support my conclusions.
Viscosity of Fluids
Factors that make fluids more viscous
1. Cold temperatures – Liquids usually become thicker and flow slower when they are cold.
2. Large or oddly shaped particles – These can slow down the flow because they bump into each other more.
3. Sticky particles – If the particles in a liquid stick together strongly (due to intermolecular forces), the liquid flows more slowly.
4. More stuff mixed in – When a liquid has a lot of things dissolved in it (like sugar in syrup), it becomes thicker and flows slower.
Viscosity
GLOSSARY
Viscosity means how thick a liquid is and how easily it flows.
-
High viscosity liquids (like honey) are thick and flow slowly.
-
Low viscosity liquids (like water) are runny and flow quickly.

🥼LAB: Comparing Liquid Viscosities
Students were interested in testing the viscosity of different liquids. To investigate this, they collected six large cylinders and filled each with equal volumes of different liquids: water, vegetable oil, honey, dish soap, salt water and shampoo.
Next, they dropped a marble into each cylinder of liquid and measured how long it took for the marble to reach the bottom. The time taken was used to compare the viscosity of each liquid — the slower the marble moved, the higher the viscosity.
Viscosity Inquiry
ACTIVITY
INSTRUCTIONS: Conduct a mini-inquiry to investigate which liquid has the highest viscosity (as measured by the slowest drop time).
Practise your Science Inquiry Skills by completing all elements of the scientific method in this mini inquiry task.

SUCCESS CRITERIA CHECKPOINT
CLOZE
✅ Define viscosity and give real-life examples.
✅ Use particle theory to explain why some liquids flow faster than others.
LEARNING INTENTIONS:
Understand how heating, cooling and pressure affects the distance between particles in solids, liquids, and gases.
SUCCESS CRITERIA:
-
Describe why solids expand when heated and contract when cooled using the particle model.
-
Describe how applying pressure changes the spacing between particles, especially in gases.
-
Explain how expansion, contraction, and compression of particles influence the design of everyday objects.
-
Compare contraction, compression and condensation.
Expansion & Contraction of Particles
When a solid is heated, its particles gain energy and vibrate more, causing them to move slightly further apart — like people in a mosh pit who are active, spread out, and taking up more space. This results in expansion.
When a solid is cooled, the particles lose energy, vibrate less, and move closer together — like a quiet, seated crowd where everyone stays still and close. This leads to contraction.

NOTE
⚠️ Expansion and contraction do not mean the particles themselves get bigger or smaller — just the space between them changes.
The ball and ring experiment demonstrates this: heating the metal ball makes its particles behave like a mosh pit, expanding the ball so it no longer fits through the ring; cooling it again causes contraction, allowing it to pass through.

If particle were like a crowd of people at a concert...
GIF CREDIT:
Weeks, E. Emory University

Less energy = closer together

More energy = further apart
Expansion + Contraction in Everyday Life
Students in science class regularly make the mistake of running hot glassware (i.e. a beaker) under cold water at the end of an experiment. This sudden change in temperature causes the outer surface of the glass to cool and contract quickly, while the inside remains hot and expanded. The uneven contraction puts stress on the glass, which can lead to cracking or even shattering.

Thermal expansion + contraction
ACTIVITY
INSTRUCTIONS: Several everyday items rely on the principles of particle expansion and contraction in their function and design. Analyse these examples and propose how thermal expansion or contraction relates to each.


THERMOMETER
SIDEWALK GAPS
RUNNING A JAR LID UNDER HOT WATER

GLASS BOTTLE CRACKING WHEN LEFT IN THE FREEZER

Contracting vs. Condensing vs. Compressing
In science, we often observe materials changing size or state when heated or cooled, or when pressure is applied. Three terms that describe different but related processes are contraction, condensing, and compressing. Although they all involve particles getting closer together, they are not the same thing.

Station Comparision
LAB
INSTRUCTIONS: Rotate around the three stations provided. At each station, determine whether you are observing contraction, condensation or compression of particles. Justify your selection using evidence from the comparison table above.
Station 1
Station 2
Station 3


SUCCESS CRITERIA CHECKPOINT
CLOZE
✅ Describe why solids expand when heated and contract when cooled using the particle model.
✅ Describe how applying pressure changes the spacing between particles, especially in gases.
✅ Explain how expansion and contraction of particles influence the design of everyday objects.
✅ Compare contraction, compression and condensation.

LEARNING INTENTIONS:
Review & consolidate learning on particles and matter.
SUCCESS CRITERIA:
-
Complete Formative Assessment Tasks #2
-
Use answers to self-assess learning progress.
-
Reflect on learning progress by identifying areas for improvement.
Formative Assessments
Formative assessment is a way for teachers to check how well you're understanding the material while you're still learning it. It's like a practice run before the big test.
The goal is to give you feedback so you can improve and understand the subject better before the final exam.
Formative Assessment #2
ACTIVITY
INSTRUCTIONS:
-
Complete this task in a similar way to how you would do a real test.
-
When you are done, use the answer key (provided by your teacher) to self-assess your responses.
[7] Diffusion
That Sweet Perfume Smell...
HOOK
DEMO: Your teacher will spray perfume in one corner of the classroom.
BEFORE: Predict what will happen when your teacher sprays the perfume. Will everyone smell it at the same time? Why or why not?
DURING: Raise your hand as soon as you can smell the perfume. What do you notice about how long it takes different people to smell it?
AFTER: What might this tell us about how gas particles move?

LEARNING INTENTIONS:
Understand how diffusion happens and why it occurs.
SUCCESS CRITERIA:
-
Define diffusion.
-
Use the particle model to explain how diffusion works in fluids (gases + liquids)
Diffusion
Diffusion is the movement of particles from an area of high concentration to an area of low concentration. It happens because particles are always moving and bumping into each other, causing them to spread out. Diffusion doesn’t need any added energy—it happens naturally due to the motion of particles.
It can occur in gases, like when perfume spreads through the air, or in liquids, like when food colouring spreads in water. In solids, diffusion is much slower because the particles are tightly packed and can only vibrate in place. However, over a long time and especially at higher temperatures, some particles (like atoms) can slowly move through a solid. This is still diffusion, but it’s much less noticeable than in gases or liquids.
Particle Diffusion
GRAPHIC ORGANISER
A graphic organiser is a visual tool like a chart or diagram that helps you sort and show ideas clearly. It makes learning easier by breaking down information, showing connections, and helping you remember things better. Consolidate your understanding of diffusion by completing the graphic organiser provided.
Create Art with Skittles Diffusion
ACTIVITY
Purpose: To observe how sugar and food colouring diffuse in water — and turn your
observations into colourful art!
Instructions:
-
Place the Skittles in a configuration of your choosing (ie. a circle) on a paper plate. Try to alternate the colours evenly.
-
Slowly pour warm water into the center of the plate until the water just touches the Skittles.
-
Watch the colours dissolve and spread. Try not to bump the plate.
-
Choose one or more of these creative ways to capture what you see...


OPTION 1: Watercolour Print
Layer tissue or watercolour paper over the diffused colours. Gently press it down to soak up the colour without disturbing the Skittles. Leave for 20–30 seconds, then lift carefully and lay flat to dry.

OPTION 2: Make a Before & After Poster
Divide a page in half:
-
On one side, draw the Skittles arranged in a circle.
-
On the other side, draw or paint what it looked like after the colors spread.

OPTION 3: Take a Photo Sequence
Take a photo every 30 seconds to show how the colors move and mix. Use them to make a slideshow, animation, or digital collage.
EXTENSION: Repeat the experiment to make more interesting patterns and designs.
SUCCESS CRITERIA CHECKPOINT
CLOZE
✅ Define diffusion.
✅ Use the particle model to explain how diffusion works in fluids (gases + liquids).
[8] Sublimation
Dry Ice vs. Lava - which will win?
HOOK
Watch the video Dry Ice vs Lava by Press Tube. As you watch, think like a scientist - observe carefully, make predictions, and look for changes in state - then answer the following questions:
1) What did you observe happening when the lava touched the dry ice? Was your prediction correct? Explain.
2) How did the rock (lava) change state during the video? What caused these changes?
3) The dry ice produced thick "steam" or fog during the reaction. What do you think caused this effect?
LEARNING INTENTIONS:
Understand the phase changes sublimation & deposition.
SUCCESS CRITERIA:
-
Define sublimation and deposition.
-
Observe the sublimation phase change of dry ice.
Sublimation & Deposition
Sublimation is when a solid turns straight into a gas without turning into a liquid first.
Deposition is the opposite – it’s when a gas turns straight into a solid without becoming a liquid.
An easy example of sublimation is dry ice. Dry ice is the solid form of carbon dioxide. When you leave it out at room temperature, it doesn’t melt into a liquid like ice does. Instead, it turns straight into carbon dioxide gas. That’s why it looks like it’s “smoking” – the fog you see is actually water in the air condensing because of the cold gas.
An example of deposition is frost. On a really cold morning, water vapor in the air can change straight into ice crystals on a surface like a window or grass. It skips the liquid stage and goes straight from gas to solid.
Observing the Sublimation of Dry Ice
Dry ice is frozen carbon dioxide (CO2). A block of dry ice has a surface temperature of -78.5°C (it can cause severe burns due to frostbite). Dry ice sublimates directly into carbon dioxide gas rather than a liquid (it requires high pressure to change into a liquid state).
Dry Ice Sublimation
DEMO
PURPOSE: To observe the change of state from solid to gas in the example of dry ice.
⚠️Safety note - do not touch or eat the dry ice as this can cause serious burns or death. Conduct demonstration in a well ventilated room.
Observation 1
Dry ice by itself and "floating" on the desk.

Observation 2
Dry ice against a metal coin or metal ruler.

Observation 3
Dry ice in warm water.

Observation 4
Dry ice with Universal Indicator.

Observation 5
Dry ice and dish soap.

What if you ate a brick of dry ice?
The name dry ice might sound like something cold and edible, but it’s definitely not a treat you can eat. In this video, we explore what really happens if you try to swallow dry ice, why it’s so dangerous, and the surprising science behind this frozen form of carbon dioxide.
I used to think... but now I think ...
ACTIVITY
After watching the video “What If You Ate a Brick of Dry Ice?”, complete the sentence starter: “I used to think… but now I think…”. First, write what you believed about dry ice before the video, then explain how your thinking has changed after learning more. Be ready to share your response with a partner or the class.
SUCCESS CRITERIA CHECKPOINT
CLOZE
✅ Define sublimation and deposition and provide an example of each.
✅ Outline why substances with extreme temperatures can be so dangerous and explain one way to remain safe if handling these items.
[FA-3] Particles + Matter
Learning from Mistakes
HOOK
1. Watch the Animated Science video "Learning from Mistakes".
2. After watching the video - reflect on a time when a mistake helped you to learn or grow in your life.
3. State one way that reflecting on mistakes in a Formative Assessment task might improve outcomes on a Summative (Formal) Assessment task.
LEARNING INTENTIONS:
Review & consolidate learning on particles and matter.
SUCCESS CRITERIA:
-
Complete Formative Assessment Tasks #3
-
Use answers to self-assess learning progress.
-
Reflect on learning progress by identifying areas for improvement.
Formative Assessments
Formative assessment is a way for teachers to check how well you're understanding the material while you're still learning it. It's like a practice run before the big test.
The goal is to give you feedback so you can improve and understand the subject better before the final exam.
Formative Assessment #3
ACTIVITY
INSTRUCTIONS:
-
Complete this task in a similar way to how you would do a real test.
-
When you are done, use the answer key (provided by your teacher) to self-assess your responses.

LEARNING INTENTIONS:
Review learning of particles & matter through a creative manner.
SUCCESS CRITERIA:
-
Design and build a product (physical or digital) that creatively consolidates your learning on particles & matter.
-
Share your finished project with your teacher and peers.
PROJECT: Tic, Tac, Toe
A Boy and His Atom: The World’s Smallest Movie by IBM shows how even tiny ideas can be turned into something creative. With a Tic-Tac-Toe Choice Board, you’ll do the same!
Particles & Matter
TIC, TAC, TOE
-
Choose three squares from the Tic-Tac-Toe choice board grid.
-
Combine your three selected squares to guide the project you will create to show what you’ve learned in this unit.
-
Pick the options that best match your skills and interests, such as drawing, acting, or creating a video.
REMEMBER: You will be sharing your finished product with the class!

SUCCESS CRITERIA CHECKPOINT
CLOZE
✅ I have designed and built a product (physical or digital) that creatively consolidates my learning on particles & matter.
✅ I have shared my finished project with my teacher and peers.
✅ Describe one new or cool thing that you learnt from viewing your peers projects.